NEW EXTENDER SETUP
Learn how to configure your
router by choosing a path below.
Easy Troubleshooting for Connecting your Routers / Extenders with Our Guidance
Extender Setup Using Manual Method
To set up an extender manually:
- Plug the extender into a power outlet near your router.
- Connect to the extender’s default Wi-Fi network using a device.
- Open a web browser and go to the extender’s IP address (usually listed in the manual).
- Log in with default credentials (often “admin” for both username and password).
- Select your home Wi-Fi network and enter the password.
- Place the extender in an optimal location (midway between the router and weak signal areas).
- Save settings and reconnect your device to the extended network.

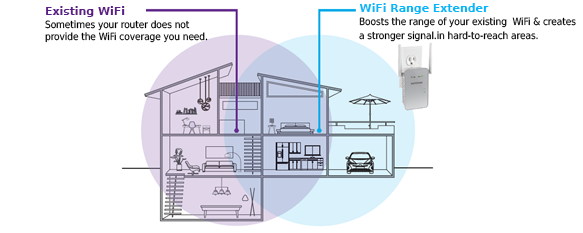
An extender doesn’t directly connect to the modem. Here’s how the connections work:
- Modem: Connects to the internet service via your ISP.
- Router: Connects to the modem via Ethernet cable to broadcast the internet signal wirelessly.
- Extender: Connects wirelessly to the router’s Wi-Fi signal, amplifying it to extend coverage in areas with weak or no signal.
No direct physical connection between the extender and the modem is required, as the extender works by boosting the router’s Wi-Fi signal.
After installing a Wi-Fi extender, the signal improves in areas with weak coverage, providing a stronger connection. However, you might experience a slight decrease in speed, especially if the extender is far from the router. Devices may also switch networks manually or have a separate SSID, depending on the setup.
Here are the steps for installing a new Wi-Fi extender:
- Plug in the Extender: Place it in a power outlet halfway between your router and the area with weak Wi-Fi coverage.
- Connect to the Extender’s Network: On your device (phone or laptop), connect to the extender’s default Wi-Fi network (usually named in the manual).
- Access Setup Page: Open a web browser and type the extender’s IP address (found in the manual) to access the setup page.
- Login: Use the default login credentials (often “admin” for both username and password).
- Select Wi-Fi Network: The setup page will prompt you to select your existing Wi-Fi network from a list.
- Enter Wi-Fi Password: Enter your Wi-Fi password to connect the extender to your router.
- Choose SSID Settings: Choose whether you want the extender to use the same Wi-Fi name (SSID) or a new one.
- Save Settings: Apply the settings and wait for the extender to reboot.
- Relocate Extender: Move the extender to a location where you need better coverage, ensuring it’s still within range of your router.
- Reconnect Devices: Connect your devices to the newly extended network or automatically switch if the SSID is the same.
That’s it! Your extender should now be working to boost your Wi-Fi signal.
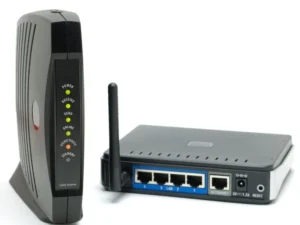
STEPS FOR INSTALLING A NEW ROUTER
Here are the steps for installing a new router:
- Unbox and Place the Router: Position the router in a central location in your home for optimal coverage. Ensure it’s near a power outlet and your modem.
- Connect to the Modem: Use an Ethernet cable to connect the router’s WAN (Internet) port to the modem.
- Power on the Router: Plug the router into a power outlet and turn it on. Wait for the lights to stabilize.
- Connect to the Router: Use Wi-Fi or an Ethernet cable to connect your computer or device to the router’s default network (SSID) — check the router label for default credentials.
- Access the Router’s Admin Page: Open a web browser and type the router’s default IP address (usually 192.168.1.1 or 192.168.0.1) to access the login page.
- Login to the Router: Use the default username and password (often “admin” for both) to log in.
- Configure Settings: Follow the setup wizard to configure the router:
- Set your Wi-Fi network name (SSID) and password.
- Configure security settings (WPA3 or WPA2 encryption recommended).
- Set the router’s time zone and other preferences.
- Update Firmware: Check for any available firmware updates and install them to ensure your router has the latest features and security.
- Reconnect Devices: Connect your devices to the newly set up Wi-Fi network using the new SSID and password.
- Test the Connection: Ensure that your internet connection is stable and working by browsing or running a speed test.
Now your new router is set up and ready for use!

Common Issues
Faced while
Installation of Extender
Common issues during Wi-Fi extender installation include poor signal strength if placed too far from the router, connection failures due to incorrect password entry, or interference from walls and devices. Extenders may create a separate network, requiring manual switching, or may not automatically connect to the existing Wi-Fi. Firmware mismatches or outdated software can also cause problems. Additionally, some extenders may reduce speed due to bandwidth limitations or improper placement.
Fixing the New Extender Setup Errors
To fix errors during a new extender setup
Wi-Fi Channel Interference: If signal issues persist, try changing the Wi-Fi channel on the router to avoid interference from other networks nearby.
Check Placement: Ensure the extender is within range of the router’s signal. Avoid placing it too far from the router or behind thick walls.
Correct Credentials: Double-check the Wi-Fi network name (SSID) and password entered during setup. Ensure they’re typed correctly.
Reset Extender: If the setup fails, press the reset button on the extender to restore default settings and try again.
Update Firmware: Check if the extender has the latest firmware. If not, update it using the web setup page.
SSID Conflict: If using a different SSID, ensure your devices are connecting to the correct network. You may want to set the same SSID as your router for seamless connection.
Reboot Devices: Restart the router, extender, and connected devices to fix any temporary network issues.
Check Router Compatibility: Ensure the extender is compatible with your router’s Wi-Fi standards (e.g., 2.4GHz vs. 5GHz).
We love what we do and therefore come up with the best possible solutions to help you set and grow online quickly. We are your trusted partners you can count on.

DISCLAIMER
WiFiExtSetup provides independent content and guidance related to Wi-Fi extender setup and troubleshooting. We are not affiliated with any specific manufacturer or brand. All information is intended for general reference and may vary based on device models and firmware versions. We recommend consulting official product manuals or contacting customer support for specific issues. We do not guarantee results, and users follow advice at their own risk.